
How to Add CNAME Record in cPanel DNS Zone Editor
Introduction
If you want to connect a subdomain to another domain or hostname, you’ll often need to add a CNAME Record in cPanel using the DNS Zone Editor. A CNAME (Canonical Name) record is one of the most commonly used DNS records, especially when setting up websites, blogs, email services, or third-party platforms.
The good news is that adding a CNAME record in cPanel is simple and only takes a few minutes.
In this guide, you’ll learn what a CNAME record is, why it’s useful, and how to create one step by step—even if you’ve never edited DNS records before.

What Is a CNAME Record?
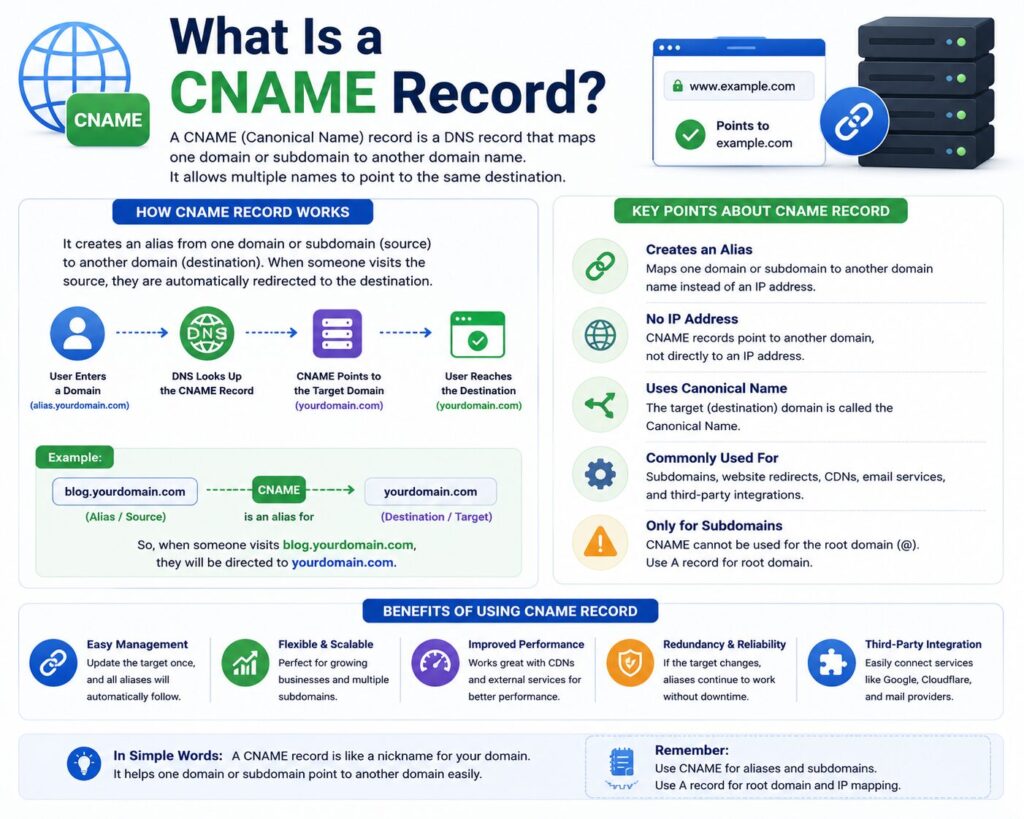
A CNAME (Canonical Name) Record is a DNS record that points one domain or subdomain to another hostname instead of directly to an IP address.
Simple Example
Imagine your main website is:
example.comYou want:
blog.example.comto open the same website hosted at:
hosting.example.netInstead of using an IP address, you simply create a CNAME Record that tells browsers:
“Whenever someone visits blog.example.com, send them to hosting.example.net.”
This makes managing websites much easier because you don’t have to update IP addresses if the destination server changes.
Why Is It Important?
Using CNAME records offers several benefits.
Benefits
- Easy to connect subdomains
- No need to remember server IP addresses
- Simplifies DNS management
- Useful for third-party services
- Makes website migrations easier
- Reduces DNS maintenance
Common Uses
- Connecting www to your main domain
- Pointing a blog to another hosting platform
- Connecting Shopify
- Connecting GitHub Pages
- Using Cloudflare services
- Verifying Microsoft 365
- Setting up Google Workspace
- CDN integrations
Requirements Before You Start
Before adding a CNAME record, make sure you have:
| Requirement | Why It’s Needed |
|---|---|
| Hosting Account | Access to your website |
| cPanel Login | To manage DNS records |
| Domain Name | The domain you’ll edit |
| Backup (Recommended) | Helps recover from mistakes |
| Web Browser | Chrome, Firefox, Edge, Safari |
| DNS Zone Access | Required to edit DNS records |
Tip: Back up your DNS records before making major changes.
Step-by-Step Guide to Add CNAME Record in cPanel Using DNS Zone Editor
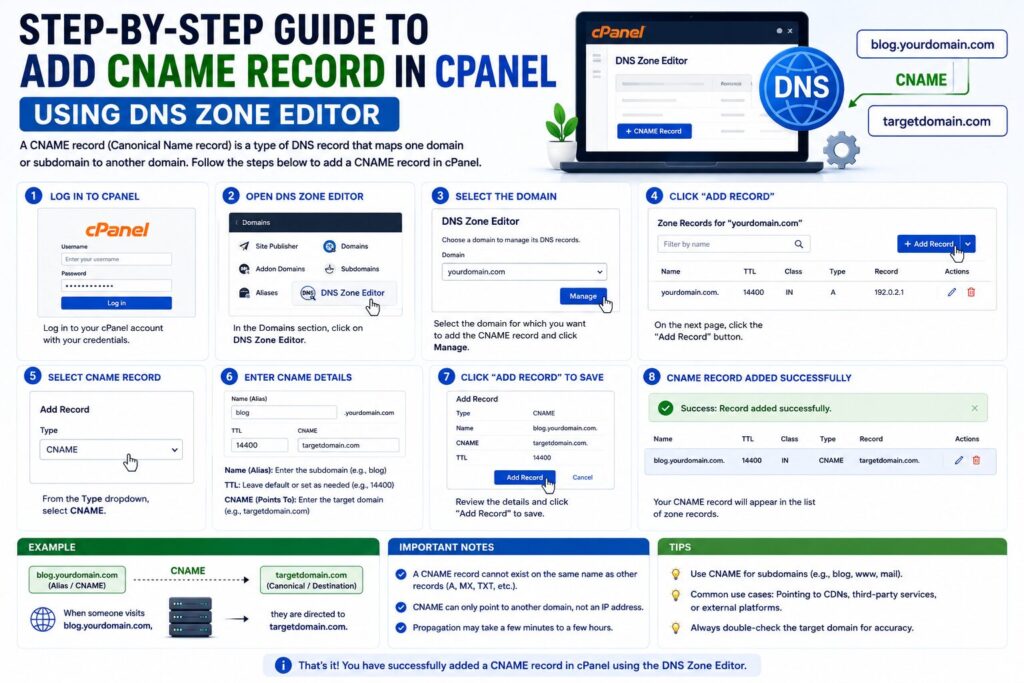
Step 1: Log in to cPanel
What to Do
Sign in to your hosting account and open cPanel.
Why
You need cPanel to manage your website’s DNS records.
What You’ll See
The cPanel dashboard with various management tools.
Beginner Tip
Use the search box and type:
Zone Editorto find it quickly.
Common Mistake
Using the wrong cPanel login credentials.
Step 2: Open DNS Zone Editor
What to Do
Click Zone Editor inside cPanel.
Why
The Zone Editor lets you manage DNS records for your domains.
What You’ll See
A list of domains hosted in your account.
Beginner Tip
Choose the correct domain before making changes.
Common Mistake
Editing the wrong domain.
Step 3: Select Your Domain
Click Manage next to the domain where you want to add the CNAME record.
Why
This opens all DNS records for that domain.
You’ll See
- A Record
- MX Record
- TXT Record
- CNAME Record
- SRV Record
Beginner Tip
Double-check the domain name before editing.
Step 4: Click Add Record
Click + Add Record.
Choose:
CNAME
Why
This creates a new Canonical Name record.
You’ll See
A form asking for DNS information.
Common Mistake
Selecting the wrong record type.
Step 5: Enter the CNAME Record Details
Fill in the required fields.
| Field | Example |
|---|---|
| Name | blog |
| TTL | 14400 |
| Type | CNAME |
| Record (Target) | hosting.example.net |
What These Mean
Name
The subdomain you want to create.
Example:
blogcreates
blog.example.comTTL
How long DNS servers should cache the record.
Default values usually work well.
Record
The hostname where traffic should go.
Beginner Tip
Do not enter an IP address in the Record field.
Step 6: Save the Record
Click:
Save Record
or
Add Record
depending on your cPanel version.
Why
This publishes the DNS record.
You’ll See
A success confirmation message.
Beginner Tip
Changes usually take a few minutes but can take up to 24 hours worldwide.
Common Mistake
Expecting the record to work instantly.
Common Types of DNS Records
| Record | Purpose |
|---|---|
| A Record | Points to an IPv4 address |
| AAAA Record | Points to an IPv6 address |
| CNAME Record | Points to another hostname |
| MX Record | Directs email |
| TXT Record | Stores verification and security information |
| SRV Record | Used for specific services |
Best Practices
- Always verify the destination hostname.
- Keep the default TTL unless instructed otherwise.
- Back up DNS settings before changes.
- Wait for DNS propagation.
- Avoid duplicate CNAME records.
- Test the subdomain after saving.
- Follow instructions from your hosting provider.
Common Problems and Solutions
| Problem | Solution |
|---|---|
| Record not working | Wait for DNS propagation |
| Wrong hostname | Verify the destination name |
| DNS changes delayed | Allow up to 24 hours |
| Duplicate CNAME | Remove duplicate entries |
| Website unavailable | Check spelling and DNS settings |
| Browser shows old site | Clear browser and DNS cache |
FAQs
1. What is a CNAME Record?
It points one hostname or subdomain to another hostname instead of an IP address.
2. Can I point a CNAME to an IP address?
No.
CNAME records must point to another hostname.
3. How long does a CNAME record take to work?
Usually within a few minutes, but global DNS propagation can take up to 24 hours.
4. Can I create multiple CNAME records?
Yes, for different subdomains.
5. Can I use a CNAME for the root domain?
Generally, no.
The root domain usually uses an A Record.
6. Is editing DNS safe?
Yes, if you know what you’re changing.
Always keep a backup.
7. Can I delete a CNAME later?
Yes.
You can edit or remove it anytime from the DNS Zone Editor.
8. Why isn’t my CNAME working immediately?
DNS propagation takes time.
Also check for spelling mistakes.
Conclusion
Knowing how to add a CNAME Record in cPanel using the DNS Zone Editor is an essential skill for managing websites, connecting subdomains, and integrating third-party services. By following the steps in this guide, you can safely create a CNAME record without needing advanced technical knowledge.
Always double-check the hostname, avoid duplicate records, and allow time for DNS propagation. With careful DNS management, your website and online services will work more reliably.
