
How to Create a Database Username in cPanel (2026 Beginner’s Guide)
How to Create a Database Username in cPanel (2026 Beginner’s Guide)
Creating a database username in cPanel is an important step when setting up a website, installing WordPress, or connecting an application to a MySQL database. A database username allows your website to securely access the information stored in your database.
In this beginner-friendly guide, you’ll learn exactly how to create a database username in cPanel, assign it to a database, and avoid common mistakes. Even if you’ve never used cPanel before, you can follow these simple steps.

What Is a Database Username in cPanel?
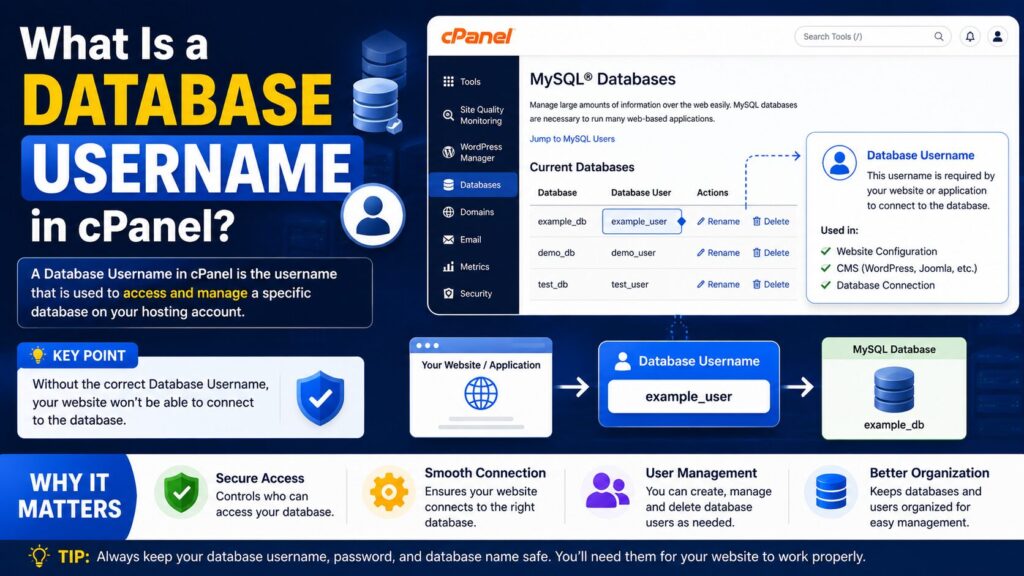
A database username is a user account that has permission to access one or more MySQL databases.
Think of it like this:
- Database = A locked storage room
- Database Username = The person allowed to enter
- Password = The key
- Permissions = What that person is allowed to do inside the room
Without a database username, your website cannot connect to the database.
For example:
When installing WordPress, you’ll need:
- Database name
- Database username
- Database password
WordPress uses these details to store and retrieve your website content.
Why Is Creating a Database Username Important?
Creating a database username helps keep your website secure and organized.
Benefits include:
- Allows websites to connect to databases
- Improves security with password protection
- Lets you control database permissions
- Supports multiple websites with different users
- Makes database management easier
Common situations where you’ll need one:
- Installing WordPress
- Setting up Joomla or Drupal
- Creating custom PHP applications
- Connecting Laravel projects
- Using eCommerce software
Requirements Before You Start
Before creating a database username, make sure you have:
- ✅ An active web hosting account
- ✅ Access to cPanel
- ✅ A MySQL database (or create one first)
- ✅ A modern web browser
- ✅ A secure password ready
- ✅ A recent website backup (recommended)
Tip: If you’re creating a new website, create the database first, then create the database username.
Step-by-Step Guide to Create a Database Username in cPanel
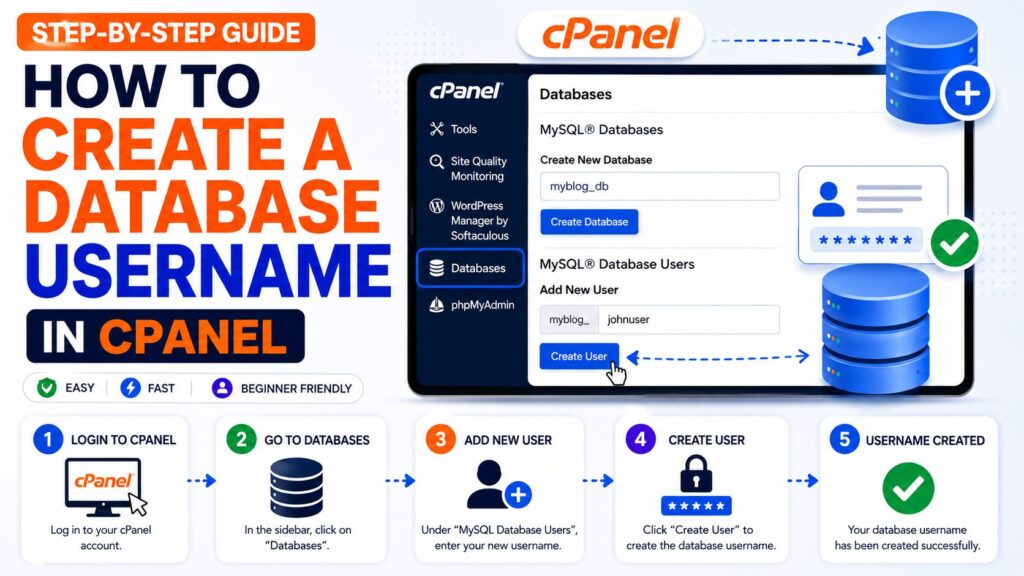
Step 1: Log in to cPanel
What to do
Log in to your hosting account and open cPanel.
Why you’re doing it
All database management tools are located inside cPanel.
What you’ll see
The cPanel dashboard with different sections such as:
- Files
- Databases
- Domains
Beginner Tip
Use the search bar at the top of cPanel to quickly find MySQL Databases.
Common Mistake
Trying to create users without having permission to access cPanel.
Step 2: Open MySQL Databases
What to do
Scroll to the Databases section.
Click:
MySQL® Databases
Why you’re doing it
This is where you can:
- Create databases
- Create database users
- Assign users to databases
What you’ll see
Several sections including:
- Create New Database
- MySQL Users
- Add User to Database
Beginner Tip
If you don’t see MySQL Databases, your hosting provider may be using MySQL Database Wizard instead.
Common Mistake
Opening phpMyAdmin instead of MySQL Databases.
Step 3: Scroll to the MySQL Users Section
Find the section called:
MySQL Users
This area allows you to create a new database username.
Step 4: Create the Database Username
What to do
Enter:
Username
Example:
mywebsite_userThen create a strong password.
You can:
- Type your own password
- Use Password Generator
Why you’re doing it
The username and password allow applications to securely connect to your database.
What you’ll see
Fields for:
- Username
- Password
- Password Again
Then click:
Create User
Beginner Tip
Always use the Password Generator to create a secure password.
Common Mistake
Using simple passwords like:
123456
password
admin
These are easy for attackers to guess.
Step 5: Add the User to a Database
Creating a user alone is not enough.
Now scroll to:
Add User To Database
Select:
- Database User
- Database
Click:
Add
Why you’re doing it
This links the username with the database.
Without this step, the user cannot access the database.
What you’ll see
A permissions page.
Step 6: Assign Database Privileges
You’ll now choose what the user can do.
For most websites, simply select:
ALL PRIVILEGES
Click:
Make Changes
Why you’re doing it
This gives the application permission to:
- Read data
- Write data
- Edit records
- Delete records
- Create tables
Beginner Tip
For WordPress installations, selecting ALL PRIVILEGES is the easiest option.
Common Mistake
Forgetting to click Make Changes after selecting permissions.
Step 7: Verify Everything
Go back to the MySQL Databases page.
You should now see:
- Database
- Username
- Assigned privileges
Your database username is now ready to use.
Understanding Database Privileges
| Permission | What It Does |
|---|---|
| SELECT | Read data |
| INSERT | Add new data |
| UPDATE | Edit existing data |
| DELETE | Remove records |
| CREATE | Create new tables |
| DROP | Delete tables |
| ALTER | Modify table structure |
| ALL PRIVILEGES | Gives full database access |
For most CMS platforms, ALL PRIVILEGES is recommended.
Best Practices
- Use strong passwords.
- Create separate users for different websites.
- Remove unused database users.
- Grant only the permissions you need.
- Keep your database credentials private.
- Back up your database regularly.
- Change passwords periodically.
- Store credentials in a secure password manager.
Common Problems and Solutions
| Problem | Solution |
|---|---|
| Cannot create user | Check username length limits and hosting restrictions. |
| Username already exists | Choose a different username. |
| Access denied | Ensure the user has been assigned to the database. |
| Website can’t connect | Verify the database name, username, and password. |
| Forgot password | Reset the database user’s password in cPanel. |
| Permission errors | Assign the correct privileges or use ALL PRIVILEGES. |
Checklist
Before leaving cPanel, confirm:
- ✅ Database created
- ✅ Database username created
- ✅ Strong password saved
- ✅ User added to database
- ✅ ALL PRIVILEGES assigned (if required)
- ✅ Connection details stored safely
Frequently Asked Questions
1. What is a database username?
It’s a user account that allows applications to access a MySQL database securely.
2. Can I create multiple database users?
Yes. You can create multiple users and assign each one to different databases.
3. Do I need a database username for WordPress?
Yes. WordPress requires a database name, username, password, and database host during installation.
4. Is it safe to use the same database user for multiple websites?
It’s better to create separate users for each website to improve security.
5. What happens if I delete a database user?
Any website using that username will lose access to the database until a valid user is assigned.
6. Can I change a database user’s password later?
Yes. You can update the password from the MySQL Databases page in cPanel.
7. Should I use ALL PRIVILEGES?
For most CMS applications like WordPress, Joomla, and Drupal, yes. Custom applications may only require specific permissions.
8. Where should I store my database credentials?
Save them in a secure password manager or encrypted document. Never share them publicly.
Conclusion
Creating a database username in cPanel is a simple but essential task for managing websites and applications. By creating a secure username, assigning it to the correct database, and granting the appropriate permissions, you ensure your website can communicate safely with its database.
Whether you’re installing WordPress, building a custom application, or managing multiple websites, understanding how to create a database username in cPanel will help you keep your hosting environment secure and organized. Remember to use strong passwords, assign only the permissions you need, and keep your database credentials in a safe place.
