
How to Add A Record in cPanel Using DNS Zone Editor
How to Add A Record in cPanel Using DNS Zone Editor (2026 Beginner’s Guide)
Introduction
If you want your domain or subdomain to point to a specific server, you’ll need to add an A Record in cPanel using the DNS Zone Editor.
An A Record is one of the most important DNS records because it connects your domain name to an IPv4 address. Whether you’re moving your website to a new hosting provider, creating a subdomain, or pointing your domain to a VPS, adding an A Record is often the first step.
In this beginner-friendly guide, you’ll learn what an A Record is, why it’s important, and exactly how to add one using cPanel’s DNS Zone Editor.

What Is an A Record?
An A Record (Address Record) is a DNS record that connects a domain name to an IPv4 address.
Instead of remembering numbers like:
192.168.10.25people simply visit:
yourdomain.comThe A Record tells the internet which server should open when someone visits your website.
Simple Example
Imagine your website is a house.
- Your domain name is the house address.
- The IP address is the exact GPS location.
- The A Record tells visitors where the house is located.
Without an A Record, browsers wouldn’t know where your website is hosted.
Why Is Adding an A Record Important?
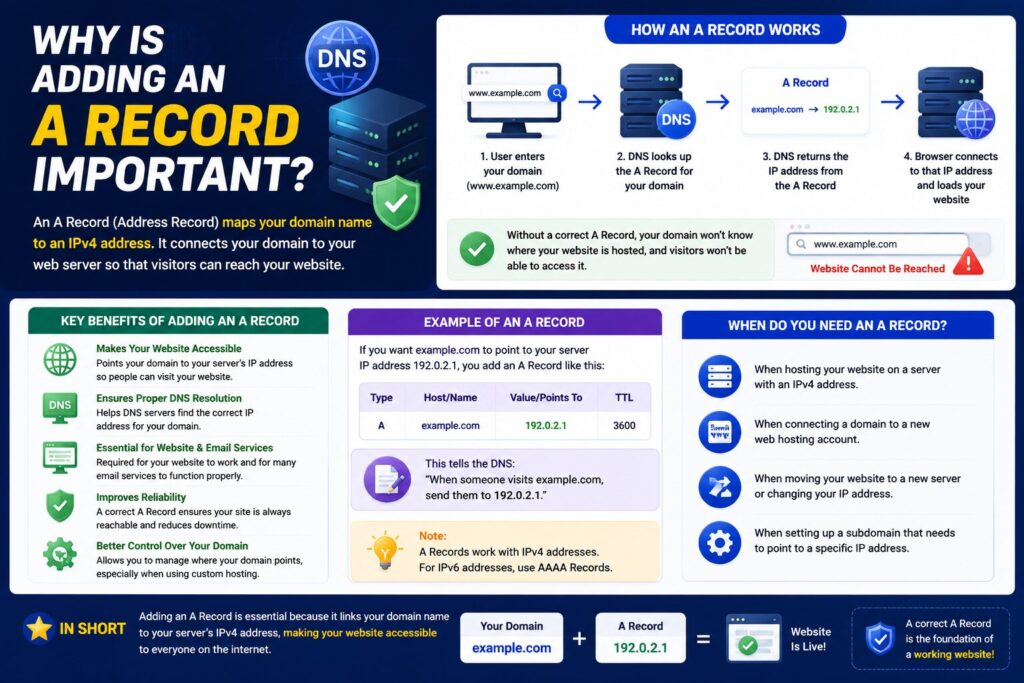
Adding an A Record helps you:
- Point your website to a new hosting server
- Connect a subdomain to another server
- Migrate your website
- Host websites on VPS or Dedicated Servers
- Test websites before changing nameservers
- Connect external services that require an IP address
It’s one of the most commonly used DNS records.
Requirements Before You Start
Before making DNS changes, make sure you have:
| Requirement | Why You Need It |
|---|---|
| cPanel account | To access DNS Zone Editor |
| Domain name | The domain you’ll edit |
| Server IPv4 address | The destination IP |
| Web browser | To log into cPanel |
| Backup of current DNS | In case you need to restore settings |
| Administrator access | Required to edit DNS records |
Important: DNS changes may take anywhere from a few minutes to 24–48 hours to fully update across the internet.
Step-by-Step Guide to Add A Record in cPanel Using DNS Zone Editor
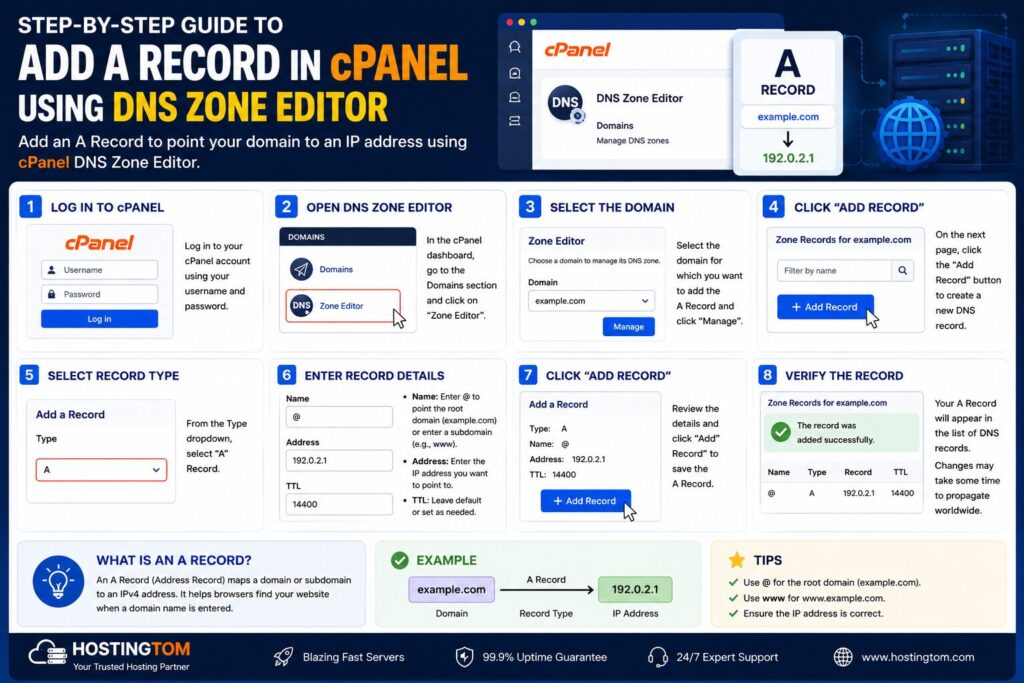
Step 1: Log in to cPanel
Open your hosting control panel and sign in using your username and password.
Why?
You need administrator access before editing DNS records.
What You’ll See
The cPanel dashboard with different management tools.
Beginner Tip
Use HTTPS when accessing cPanel for better security.
Common Mistake
Logging into the wrong hosting account.
Step 2: Open the Zone Editor
Scroll to the Domains section.
Click Zone Editor.
Why?
The Zone Editor lets you manage DNS records for your domains.
What You’ll See
A list of all domains connected to your hosting account.
Beginner Tip
Double-check that you’ve selected the correct domain.
Common Mistake
Editing DNS for the wrong domain.
Step 3: Manage the Domain Zone
Find your domain.
Click Manage beside the domain.
Why?
This opens the DNS records associated with your website.
What You’ll See
Existing records such as:
- A Records
- CNAME Records
- MX Records
- TXT Records
Step 4: Click Add Record
Select + Add Record.
Choose Add A Record if your cPanel version provides that option.
Otherwise, manually create one.
Why?
You’re creating a new DNS entry.
Beginner Tip
Check whether an A Record already exists before creating another one.
Common Mistake
Creating duplicate records for the same hostname.
Step 5: Enter the Record Details
Fill in the required information.
| Field | Example |
|---|---|
| Name | blog |
| Record Type | A |
| Address | 203.0.113.50 |
| TTL | 14400 |
If you want the root domain:
@For a subdomain:
blogWhy?
These values tell DNS where the domain should point.
Beginner Tip
Copy and paste the IP address to avoid typing mistakes.
Common Mistake
Entering an incorrect IP address.
Step 6: Save the Record
Click Save Record or Add Record.
Why?
This publishes your DNS change.
What You’ll See
A success message confirming the record has been added.
Step 7: Wait for DNS Propagation
Your changes won’t always appear instantly.
DNS propagation usually takes:
- 5 minutes
- 30 minutes
- A few hours
- Up to 48 hours
Beginner Tip
Be patient before troubleshooting.
Understanding Common DNS Records
| Record | Purpose |
|---|---|
| A Record | Points domain to IPv4 address |
| AAAA Record | Points domain to IPv6 address |
| CNAME | Creates an alias for another domain |
| MX | Directs email traffic |
| TXT | Stores verification and security information |
| NS | Defines nameservers |
Best Practices
- Keep a backup of your DNS records.
- Verify the IP address before saving.
- Avoid duplicate A Records.
- Wait for DNS propagation before making more changes.
- Test your website after updating DNS.
- Keep TTL at the default value unless instructed otherwise.
- Remove outdated DNS records when no longer needed.
- Document every DNS change.
Common Problems and Solutions
| Problem | Solution |
|---|---|
| Website doesn’t open | Verify the IP address |
| DNS changes not working | Wait for propagation |
| Wrong server loads | Check for duplicate A Records |
| Changes disappear | Ensure the record was saved |
| Can’t edit DNS | Confirm your hosting uses local DNS |
| Incorrect hostname | Review the Name field carefully |
Frequently Asked Questions
1. What does an A Record do?
It connects your domain name to an IPv4 server address.
2. Can I have multiple A Records?
Yes, but only for different hostnames or for load balancing if configured correctly.
3. How long do DNS changes take?
Usually a few minutes, but they can take up to 48 hours.
4. What happens if I enter the wrong IP address?
Visitors may reach the wrong website or receive connection errors.
5. Can I edit an existing A Record?
Yes. Simply edit the existing record instead of creating a new one.
6. Is adding an A Record safe?
Yes, provided you use the correct IP address.
7. Do I need to restart my hosting?
No.
DNS updates happen automatically.
8. Can I point a subdomain to another server?
Yes.
Simply create an A Record for the subdomain.
Conclusion
Knowing how to add A Record in cPanel using DNS Zone Editor is an essential skill for every website owner. Whether you’re launching a new website, moving to a new hosting provider, or setting up a subdomain, adding an A Record ensures your domain points to the correct server.
Always double-check the IP address before saving, keep a backup of your DNS records, and allow time for DNS propagation. With the steps in this guide, even beginners can confidently manage A Records in cPanel.
