
How to Set the PHP Version per Domain Using cPanel (2026)
How to Set the PHP Version per Domain Using cPanel (2026 Beginner’s Guide)

Changing the PHP version for a specific domain is one of the easiest ways to improve your website’s compatibility, security, and performance. Whether you’re running a WordPress website, an online store, or a custom PHP application, selecting the correct PHP version helps your website run smoothly.
In this guide, you’ll learn how to set the PHP version per domain using cPanel with simple step-by-step instructions. Even if you’ve never used cPanel before, you’ll be able to follow along easily.
What Is Setting the PHP Version per Domain?
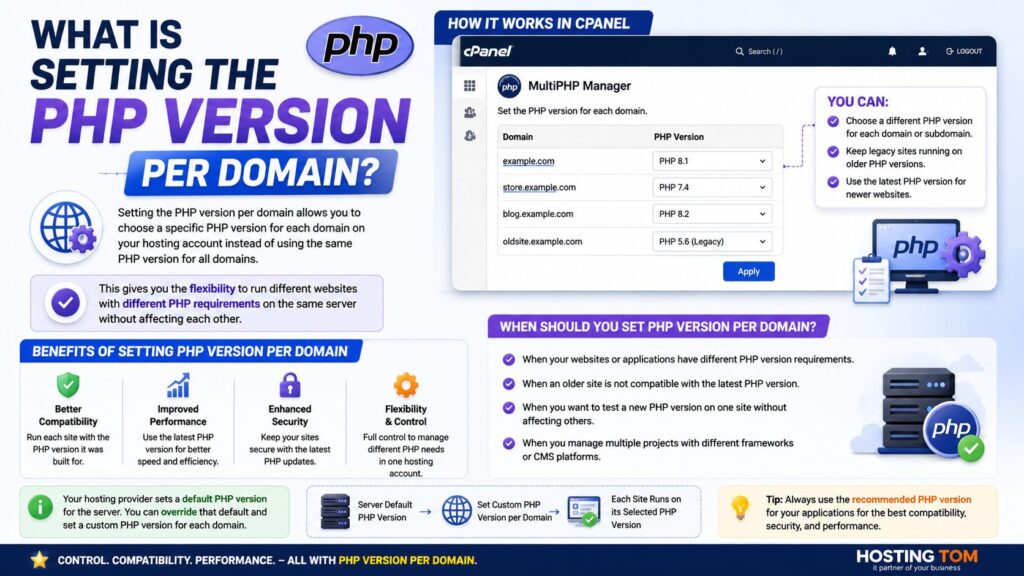
Setting the PHP version per domain means choosing which version of PHP a specific website or domain should use.
PHP is the programming language that powers many websites, including WordPress. Different websites may require different PHP versions to work properly.
Real-World Example
Imagine you have two websites:
- blog.example.com uses the latest WordPress version and supports PHP 8.3.
- shop.example.com runs an older application that only works with PHP 7.4.
Instead of changing PHP for your entire hosting account, you can assign different PHP versions to each domain individually.
This gives you greater flexibility and prevents compatibility issues.
Why Is It Important?
Setting the correct PHP version provides several benefits:
- Improves website performance
- Increases security
- Fixes compatibility problems
- Supports older applications
- Allows multiple websites to use different PHP versions
- Reduces website errors after software updates
It is especially useful if your hosting account contains multiple websites.
Requirements Before You Start
Before changing the PHP version, make sure you have:
| Requirement | Why It’s Needed |
|---|---|
| cPanel hosting account | To manage your website |
| cPanel login credentials | To access hosting settings |
| Domain already added | The domain must exist in cPanel |
| Modern web browser | Chrome, Firefox, Edge, or Safari |
| Website backup | To restore your site if needed |
| Enough storage | For backups and website files |
Tip: Always create a full website backup before changing the PHP version.
Step-by-Step Guide to Set the PHP Version per Domain Using cPanel
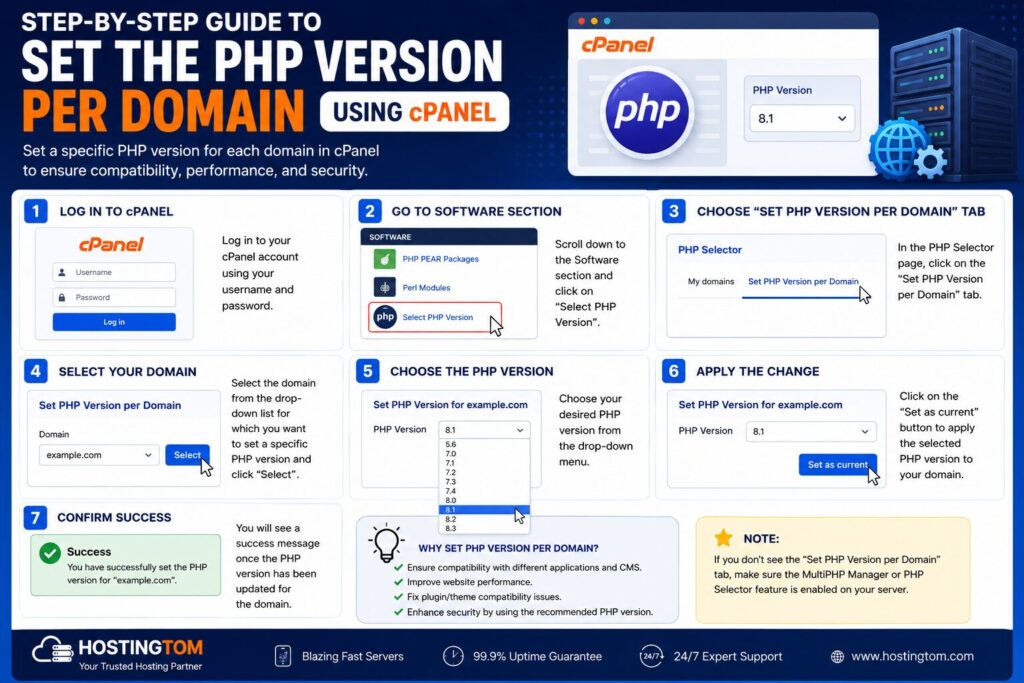
Step 1: Log in to cPanel
What to do
Open your hosting account and log in to cPanel using your username and password.
Why you’re doing it
cPanel is where you manage website settings, including PHP versions.
What you’ll see
The cPanel dashboard with various tools and icons.
Beginner Tip
Use the search box at the top of cPanel if you can’t find a feature.
Common Mistake
Using incorrect login credentials.
Step 2: Open Select PHP Version or MultiPHP Manager
What to do
Search for one of these tools:
- Select PHP Version
- MultiPHP Manager
The available option depends on your hosting provider.
Why you’re doing it
This tool allows you to change the PHP version for individual domains.
What you’ll see
A list of domains hosted on your account.
Beginner Tip
Some hosting providers use CloudLinux’s Select PHP Version, while others use MultiPHP Manager.
Common Mistake
Opening PHP INI Editor instead of the PHP Version tool.
Step 3: Select Your Domain
What to do
Find the domain whose PHP version you want to change.
Check the box or click on the domain name.
Why you’re doing it
This ensures only the selected website will be updated.
What you’ll see
Current PHP version displayed beside the domain.
Beginner Tip
Double-check you’re selecting the correct domain.
Common Mistake
Changing the wrong domain’s PHP version.
Step 4: Choose the Desired PHP Version
What to do
Click the PHP Version drop-down menu.
Choose the version you want.
Example:
- PHP 8.1
- PHP 8.2
- PHP 8.3
Why you’re doing it
Different applications require different PHP versions.
What you’ll see
A list of available PHP versions.
Beginner Tip
Use the latest stable version unless your application requires an older one.
Common Mistake
Selecting an unsupported version for older software.
Step 5: Apply or Save Changes
What to do
Click:
- Apply
- Save
- Set as Current
(depending on your hosting provider)
Why you’re doing it
This activates the selected PHP version.
What you’ll see
A success confirmation message.
Beginner Tip
Wait a few moments before checking your website.
Common Mistake
Closing the browser before the changes finish saving.
Step 6: Verify the PHP Version
What to do
Visit your website or create a simple phpinfo.php file.
Why you’re doing it
This confirms the new PHP version is active.
What you’ll see
Your website loads normally or displays the new PHP version.
Beginner Tip
Test important pages after making the change.
Common Mistake
Not checking if plugins or themes still work.
Available PHP Versions
Depending on your hosting provider, you may see versions like:
| PHP Version | Recommended |
|---|---|
| PHP 7.4 | Legacy websites only |
| PHP 8.0 | Older applications |
| PHP 8.1 | Supported |
| PHP 8.2 | Highly recommended |
| PHP 8.3 | Best for new websites |
Best Practices
- Always create a backup before changing PHP versions.
- Use the latest supported PHP version.
- Update WordPress, plugins, and themes first.
- Test your website after making changes.
- Remove unused plugins.
- Keep regular website backups.
- Monitor your error logs if issues occur.
Common Problems and Solutions
| Problem | Solution |
|---|---|
| Website shows a 500 error | Switch back to the previous PHP version. |
| White screen | Disable incompatible plugins. |
| PHP Version tool missing | Contact your hosting provider. |
| Website loads incorrectly | Clear your browser and website cache. |
| Plugin stops working | Update or replace the plugin. |
| Domain not listed | Ensure the domain has been added to your hosting account. |
Frequently Asked Questions (FAQs)
1. Is changing the PHP version safe?
Yes. It is safe if your website supports the selected PHP version.
2. Will changing PHP delete my website?
No. It only changes how your website runs.
3. Which PHP version should I use?
Use the latest stable version supported by your website or application.
4. Can different domains use different PHP versions?
Yes. Most cPanel hosting accounts allow different PHP versions for each domain.
5. Why is my website broken after changing PHP?
Some themes or plugins may not support the new version.
6. Can I switch back?
Yes. You can change the PHP version again anytime.
7. Does WordPress support PHP 8.x?
Most recent versions of WordPress support PHP 8.x, but always verify plugin compatibility.
8. Do I need to restart my website?
No. The changes usually apply automatically.
Conclusion
Knowing how to set the PHP version per domain using cPanel helps you keep your websites secure, compatible, and running efficiently. Whether you’re managing one website or several, assigning the correct PHP version to each domain ensures better performance and fewer compatibility issues.
Before making any changes, always create a backup, choose a supported PHP version, and test your website afterward. Following these simple steps can prevent unexpected issues and help your website stay reliable.
