
How to Access cPanel Web Disk (2026 Beginner’s Guide)
How to Access cPanel Web Disk (2026 Beginner’s Guide)
If you want an easier way to manage your website files without using the cPanel File Manager every time, cPanel Web Disk is a great solution. It lets you connect your hosting account directly to your computer, making file management as simple as working with folders on your desktop.
In this beginner-friendly guide, you’ll learn how to access cPanel Web Disk, how it works, how to connect it on Windows and macOS, common problems you may face, and the best practices to keep your files secure.

What Is cPanel Web Disk?
cPanel Web Disk is a feature that allows you to connect your hosting account as a network drive on your computer using the WebDAV protocol.
Instead of uploading files through the browser, you can simply drag and drop files between your computer and your website.
Real-World Example
Imagine you have a folder on your computer called My Website.
With Web Disk, your website appears just like another folder in Windows File Explorer or macOS Finder. You can:
- Open files
- Copy files
- Delete files
- Rename files
- Upload folders
- Move documents
without logging into cPanel every time.
Why Is It Important?
Using Web Disk can save time, especially if you frequently manage website files.
Benefits
- Faster file management
- Easy drag-and-drop uploads
- Access files directly from your computer
- No need to open File Manager repeatedly
- Works with many file editing applications
- Helpful for developers and beginners alike
Common situations where Web Disk is useful include:
- Updating website images
- Uploading documents
- Editing HTML files
- Managing WordPress media
- Organizing website backups
Step-by-Step Guide to Access cPanel Web Disk
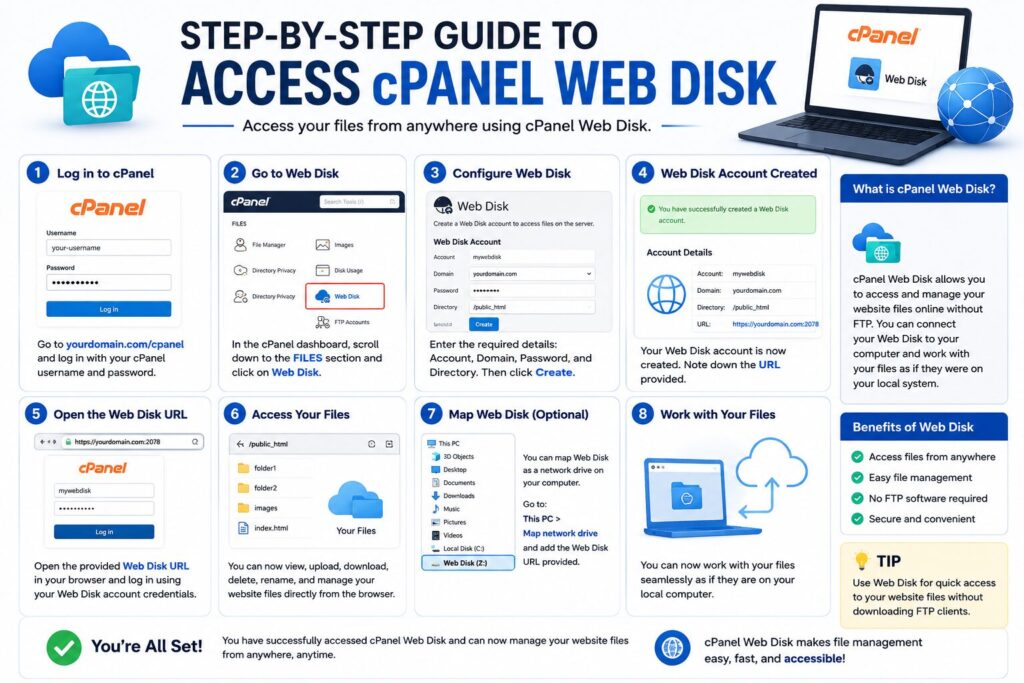
Step 1: Log in to cPanel
Open your hosting account’s cPanel login page.
Enter:
- Username
- Password
Click Log In.
Why?
You must access your hosting control panel before using Web Disk.
You’ll See
The cPanel dashboard.
Beginner Tip
Bookmark your cPanel login page for faster access.
Common Mistake
Entering incorrect login credentials.
Step 2: Open Web Disk
Scroll to the Files section.
Click Web Disk.
Why?
This is where cPanel manages Web Disk accounts and connection settings.
You’ll See
- Existing Web Disk accounts
- Create Web Disk Account option
- Connection settings
Beginner Tip
Most hosting accounts already include a default Web Disk account.
Common Mistake
Looking for Web Disk inside File Manager.
Step 3: Select Your Web Disk Account
Choose the Web Disk account you want to use.
If necessary, create a new account by providing:
- Username
- Password
- Directory
- Permissions
Why?
Different users can have different access permissions.
You’ll See
The account information and connection options.
Beginner Tip
Use a strong password.
Common Mistake
Giving full access when only a specific folder is needed.
Step 4: Configure the Connection
Click Configure Client Access.
Choose your operating system:
- Windows
- macOS
Download the connection configuration file if available.
Why?
This file automatically configures your computer to connect with the server.
You’ll See
Connection instructions and download links.
Beginner Tip
Use SSL whenever possible for secure connections.
Common Mistake
Ignoring SSL certificates, which may lead to security warnings.
Step 5: Connect to Web Disk
Open the downloaded configuration file or manually connect using the provided URL.
Enter your:
- Username
- Password
After connecting, your hosting account appears as a network drive.
Why?
Now you can access website files directly from your computer.
You’ll See
A new drive or folder containing your website files.
Beginner Tip
Save your login credentials securely.
Common Mistake
Closing the connection before file transfers finish.
Understanding Web Disk Permissions
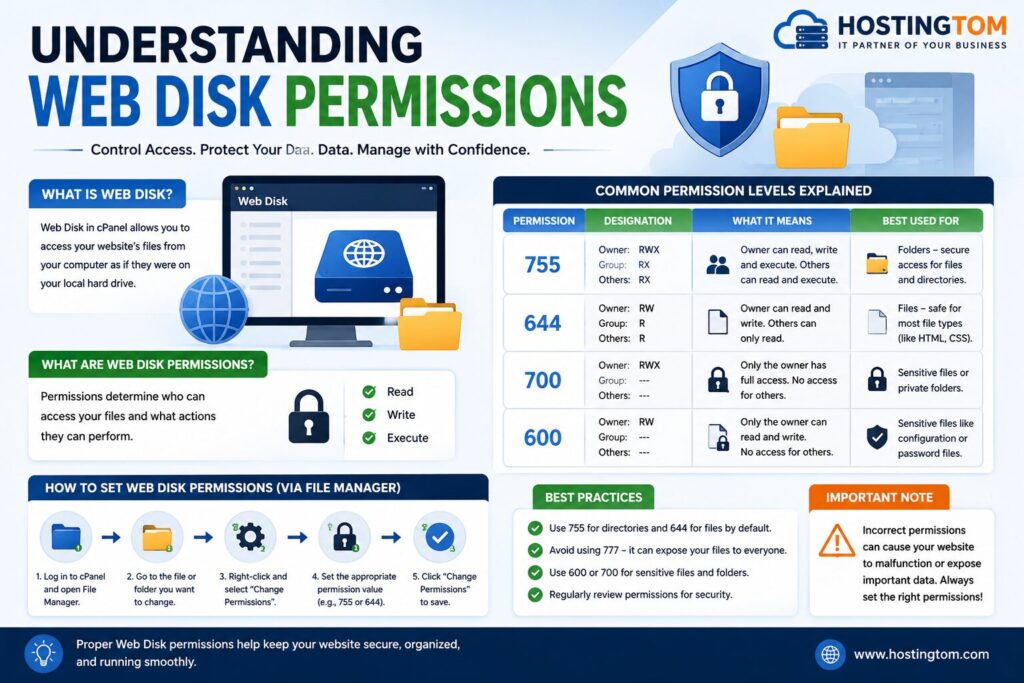
| Permission | Description | Best For |
|---|---|---|
| Read Only | View files only | Team members |
| Read/Write | Upload and edit files | Website owners |
| Home Directory | Full account access | Administrators |
| Custom Directory | Limited folder access | Designers and developers |
Best Practices
- Always connect using SSL.
- Keep your password secure.
- Disconnect after use on public computers.
- Create separate accounts for different users.
- Give only the permissions users actually need.
- Keep backups before editing files.
- Delete unused Web Disk accounts.
- Update your computer regularly.
Common Problems and Solutions
| Problem | Solution |
|---|---|
| Cannot connect | Verify username and password |
| SSL warning | Install the SSL certificate or trust the connection |
| Authentication failed | Reset the Web Disk password |
| Slow transfer speed | Check your internet connection |
| Drive not appearing | Restart your computer and reconnect |
| Permission denied | Verify account permissions |
| Files missing | Confirm you’re connected to the correct directory |
Frequently Asked Questions
1. What is cPanel Web Disk?
It allows you to access website files directly from your computer using a network drive.
2. Is Web Disk safe?
Yes. It is safe when using SSL encryption and a strong password.
3. Do I need FTP if I use Web Disk?
Not necessarily. Many users find Web Disk easier for everyday file management.
4. Can I edit website files directly?
Yes. Files can be opened and edited with compatible applications.
5. Does Web Disk work on Windows?
Yes. It supports Windows through WebDAV.
6. Does it work on macOS?
Yes. Finder supports WebDAV connections.
7. Can multiple users access Web Disk?
Yes. Separate Web Disk accounts can be created with different permissions.
8. Why can’t I connect?
Check:
- Username
- Password
- SSL settings
- Internet connection
- Firewall restrictions
Conclusion
Learning how to access cPanel Web Disk makes managing your website much easier. Instead of repeatedly opening File Manager or using FTP software, Web Disk lets you work with your website files as if they were stored on your own computer.
For beginners, this is one of the easiest ways to upload, edit, and organize website files while saving time. Just remember to use secure connections, create strong passwords, and keep regular backups before making important changes.
