
How to Create an Additional Web Disk Account in cPanel (2026 Beginner’s Guide)
What Is an Additional Web Disk Account in cPanel?
A Web Disk account allows you to access your website files directly from your computer, almost like opening a normal folder on your desktop.
An additional Web Disk account is simply another user account that you create for someone else or for a different purpose.
Real-world example
Imagine you own a business website.
- You manage the website.
- Your designer only needs access to the images folder.
- Your developer only needs access to the public_html directory.
Instead of giving everyone your main cPanel password, you create separate Web Disk accounts with limited access.
This improves both security and organization.

Why Is It Important?
Creating additional Web Disk accounts offers several benefits:
- Improves website security
- Avoids sharing your main cPanel password
- Gives each user separate login credentials
- Allows folder-level access restrictions
- Makes team collaboration easier
- Lets you revoke access without affecting others
- Helps organize different website projects
Requirements Before You Start
Before creating a new Web Disk account, make sure you have:
- ✅ An active web hosting account
- ✅ Access to cPanel
- ✅ Administrator permission to create Web Disk users
- ✅ A modern web browser
- ✅ Enough hosting storage space
- ✅ A strong password for the new account
- ✅ Knowledge of which folder the user should access
Tip: Decide which directory the user should access before creating the account. Giving access only where needed improves security.
Step-by-Step Guide to Create an Additional Web Disk Account in cPanel
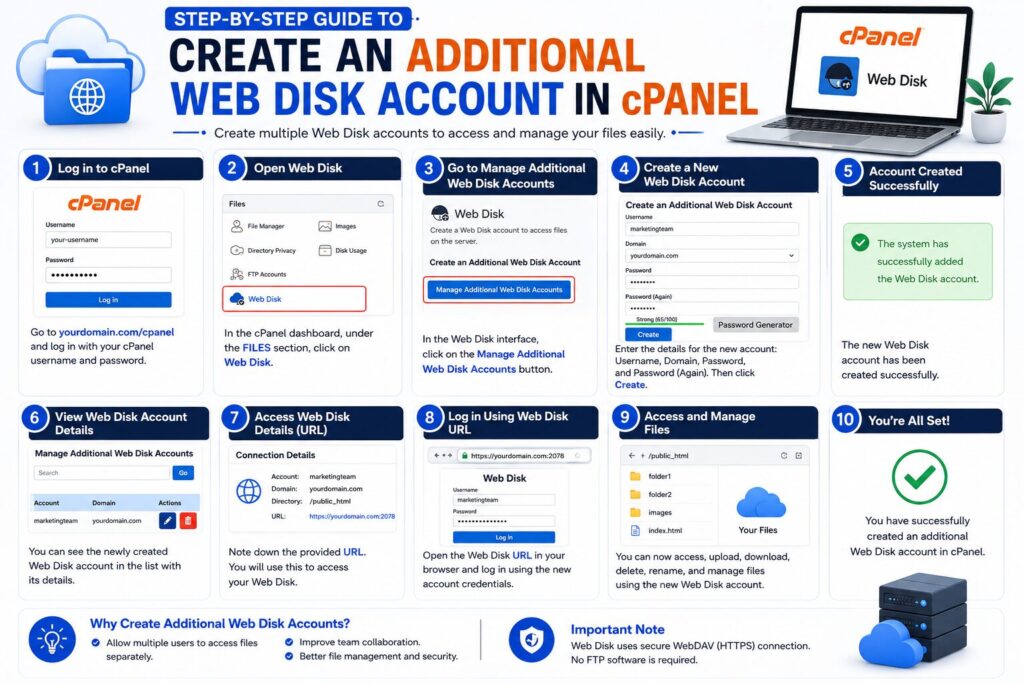
Step 1: Log in to cPanel
What to do
Open your hosting provider’s cPanel login page and sign in.
Why you’re doing it
You need administrator access to manage Web Disk accounts.
What you’ll see
The cPanel dashboard with various management tools.
Beginner Tip
Use HTTPS when logging in to keep your credentials secure.
Common Mistake
Logging in with incorrect credentials or using an outdated bookmark.
Step 2: Open the Web Disk Tool
What to do
Scroll to the Files section and click Web Disk.
Why you’re doing it
This is where all Web Disk accounts are created and managed.
What you’ll see
- Your primary Web Disk account
- Existing additional accounts (if any)
- Account creation form
Beginner Tip
Use the search box in cPanel if you cannot find the Web Disk icon.
Common Mistake
Opening File Manager instead of Web Disk.
Step 3: Locate the Create an Additional Web Disk Account Section
What to do
Scroll down until you find Create an Additional Web Disk Account.
Why you’re doing it
This section lets you create a new user.
What you’ll see
Fields including:
- Username
- Domain
- Password
- Directory
- Permissions
Beginner Tip
Read each option carefully before continuing.
Common Mistake
Skipping required fields.
Step 4: Enter a Username
What to do
Type a unique username.
Example:
designer
developer
editor
backupuser
Why you’re doing it
This becomes part of the user’s login credentials.
What you’ll see
The full username displayed with your domain.
Beginner Tip
Use names that describe the person’s role.
Common Mistake
Using spaces or special characters.
Step 5: Select the Domain
What to do
Choose the domain associated with the account.
Why you’re doing it
The account must belong to one of your hosted domains.
What you’ll see
A dropdown list of available domains.
Beginner Tip
Verify the correct domain before proceeding.
Common Mistake
Selecting the wrong website.
Step 6: Create a Strong Password
What to do
Enter a secure password or use the Password Generator.
Why you’re doing it
Strong passwords help protect website files.
What you’ll see
Password strength indicator.
Beginner Tip
Store the password safely.
Common Mistake
Using weak or reused passwords.
Step 7: Choose the Directory
What to do
Specify the folder the account can access.
Examples:
public_html
public_html/images
public_html/uploads
Why you’re doing it
This controls what files the user can see and edit.
What you’ll see
A directory path.
Beginner Tip
Give access only to the required folder.
Common Mistake
Granting access to the entire website unnecessarily.
Step 8: Select Permissions
Choose one of the following:
| Permission | Meaning |
|---|---|
| Read-Only | User can view and download files only |
| Read-Write | User can upload, edit, rename and delete files |
Why you’re doing it
Permissions determine what the user can do.
Beginner Tip
Use Read-Only unless editing is required.
Common Mistake
Giving Read-Write access to temporary users.
Step 9: Create the Account
What to do
Click Create.
Why you’re doing it
This saves the new Web Disk account.
What you’ll see
A success confirmation message.
Beginner Tip
Double-check the username and directory before clicking Create.
Common Mistake
Creating duplicate accounts.
Step 10: Configure the Connection
After creating the account, cPanel provides connection information.
You may download the configuration script for:
- Windows
- macOS
Or manually connect using WebDAV-compatible software.
Beginner Tip
Follow your operating system’s setup instructions carefully.
Understanding Web Disk Permissions
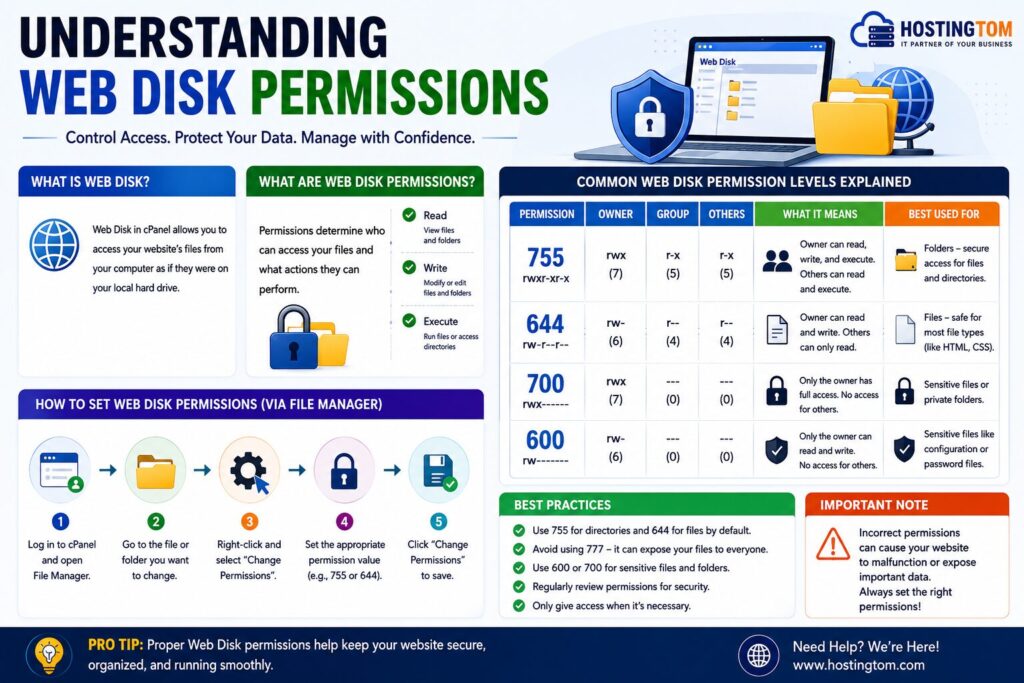
| Permission | Best For |
| Read-Only | Designers, reviewers, clients |
| Read-Write | Developers, website administrators |
| Restricted Folder Access | Freelancers, agencies, contractors |
Best Practices
- Create separate accounts for every user.
- Never share your main cPanel login.
- Use strong, unique passwords.
- Grant the minimum required permissions.
- Remove unused accounts regularly.
- Restrict folder access whenever possible.
- Update passwords periodically.
- Monitor account usage.
Common Problems and Solutions
| Problem | Solution |
| Cannot create account | Check hosting permissions or contact your hosting provider. |
| Username already exists | Choose a different username. |
| Password rejected | Use a stronger password. |
| User cannot connect | Verify server settings and credentials. |
| Permission denied | Check directory permissions. |
| Wrong folder access | Edit the account’s assigned directory. |
| Storage issues | Free up hosting disk space. |
Frequently Asked Questions (FAQs)
1. What is an additional Web Disk account?
It is a separate WebDAV user account that can access specific website folders without sharing your main cPanel login.
2. Is it safe to create multiple Web Disk accounts?
Yes. Separate accounts are much safer than sharing one password.
3. Can I limit access to one folder?
Yes. You can assign a specific directory during account creation.
4. What’s the difference between Read-Only and Read-Write?
Read-Only allows viewing and downloading files, while Read-Write also allows editing, uploading, renaming, and deleting files.
5. Can I delete a Web Disk account later?
Yes. You can remove or modify it anytime through the Web Disk interface.
6. Does deleting a Web Disk account delete website files?
No. It only removes the user’s access.
7. Can multiple users connect at the same time?
Yes, provided your hosting plan supports it.
8. Should every employee have their own account?
Yes. Individual accounts improve security and accountability.
Conclusion
Creating an additional Web Disk account in cPanel is an easy way to give secure file access without sharing your primary cPanel credentials. By assigning individual usernames, strong passwords, appropriate directories, and the correct permission level, you can safely collaborate with developers, designers, and team members while keeping your website protected.
If you regularly work with multiple users, reviewing and managing your Web Disk accounts should become part of your website security routine.
