
How to Add a User to a Database and Add Privileges (2026 Beginner’s Guide)
How to Add a User to a Database and Add Privileges (2026 Beginner’s Guide)
If you’ve created a MySQL database in cPanel, the next important step is to add a user to the database and assign the correct privileges. Without doing this, your website or application cannot access the database.
In this beginner-friendly guide, you’ll learn exactly how to add a database user, assign permissions, understand what each privilege means, and avoid common mistakes.

What Is Adding a User to a Database?
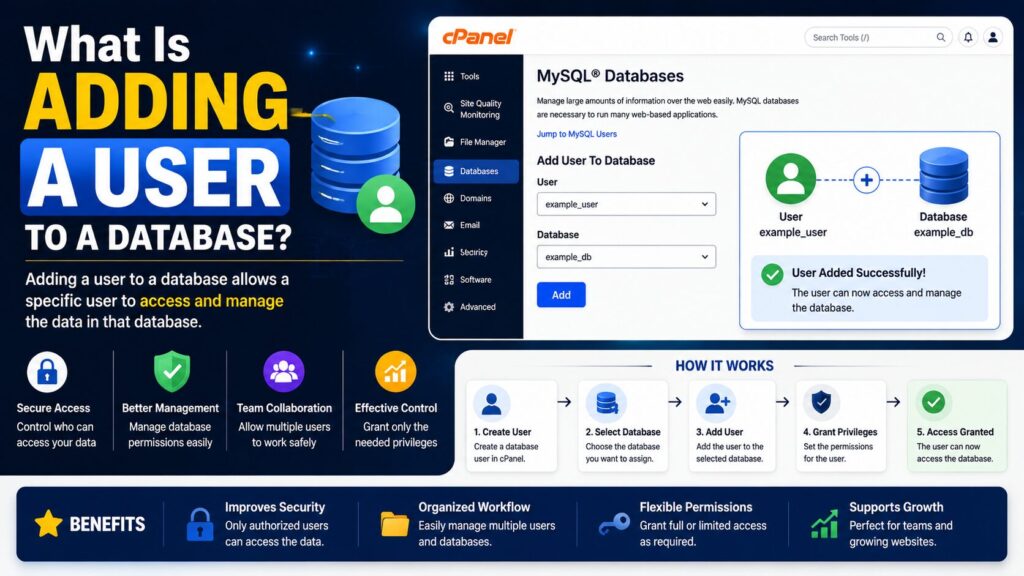
A database stores your website’s information, while a database user is like a secure key that allows your website to access that data.
Simply creating a database isn’t enough. You must connect a user to that database and decide what that user is allowed to do.
Real-world example
Imagine your database is a locked office.
- The office = Database
- The employee = Database user
- The employee’s access card = Database privileges
Without an access card, the employee cannot enter the office.
Why Is It Important?
Adding a database user with the correct privileges helps your website work properly and securely.
Benefits include:
- Allows WordPress and other applications to connect to the database
- Improves database security
- Lets you control what each user can do
- Prevents unauthorized changes
- Makes database management easier
Common situations include:
- Installing WordPress
- Setting up Joomla or Drupal
- Creating a new website
- Connecting a custom PHP application
- Migrating a website
Requirements Before You Start
Make sure you have:
- ✅ A web hosting account
- ✅ Access to cPanel
- ✅ An existing MySQL database
- ✅ A database user (or create one first)
- ✅ A modern web browser
- ✅ A recent website backup (recommended)
Tip: Always keep a backup before making important database changes.
Step-by-Step Guide
Step 1: Log in to cPanel
What to do
Open your hosting account and log in to cPanel.
Why you’re doing it
cPanel contains all database management tools.
What you’ll see
The cPanel dashboard with different management sections.
Beginner Tip
Use your hosting provider’s dashboard if you’re unsure how to access cPanel.
Common Mistake
Entering incorrect login credentials.
Step 2: Open MySQL® Databases
What to do
Scroll to the Databases section.
Click MySQL® Databases.
Why you’re doing it
This page allows you to manage databases, users, and permissions.
What you’ll see
Several sections including:
- Create Database
- Create User
- Add User to Database
Beginner Tip
You may need to scroll down because the page is long.
Common Mistake
Opening phpMyAdmin instead of MySQL Databases.
Step 3: Locate “Add User to Database”
What to do
Scroll to the Add User To Database section.
You’ll see two drop-down menus:
- User
- Database
Why you’re doing it
This is where you connect a user to a database.
What you’ll see
A simple form with:
- User list
- Database list
- Add button
Beginner Tip
If your user isn’t listed, create a database user first.
Common Mistake
Selecting the wrong database.
Step 4: Select the Database User
What to do
Choose the database user from the first drop-down menu.
Why you’re doing it
This user will be granted access to the selected database.
What you’ll see
The selected username.
Beginner Tip
Double-check the username before continuing.
Common Mistake
Choosing a different user by mistake.
Step 5: Select the Database
What to do
Choose the correct database from the second drop-down menu.
Click Add.
Why you’re doing it
This links the selected user to the chosen database.
What you’ll see
A new screen asking you to assign privileges.
Beginner Tip
Make sure the database belongs to the correct website.
Common Mistake
Adding the user to the wrong database.
Step 6: Assign Database Privileges
What to do
You’ll now see many permission options.
Examples include:
- SELECT
- INSERT
- UPDATE
- DELETE
- CREATE
- DROP
- ALTER
- INDEX
For most websites like WordPress, simply check:
ALL PRIVILEGES
Then click:
Make Changes
Why you’re doing it
Privileges determine what actions the user can perform.
What you’ll see
A success confirmation message.
Beginner Tip
For WordPress, selecting ALL PRIVILEGES is usually the easiest and recommended option.
Common Mistake
Forgetting to click Make Changes.
Step 7: Verify the Connection
What to do
Return to the MySQL Databases page.
Look under Current Databases.
Why you’re doing it
To confirm the user has been successfully added.
What you’ll see
The database name with its assigned user.
Beginner Tip
Review the privileges if something doesn’t work later.
Common Mistake
Leaving the page before confirming the changes.
Understanding Database Privileges
| Privilege | What It Allows |
|---|---|
| SELECT | Read data |
| INSERT | Add new data |
| UPDATE | Modify existing data |
| DELETE | Remove data |
| CREATE | Create new tables |
| DROP | Delete tables |
| ALTER | Change table structure |
| INDEX | Create indexes |
| ALL PRIVILEGES | Gives complete access |
Note: Only grant full privileges to trusted applications and users.
Best Practices
- Always use strong database passwords.
- Give only the permissions that are needed.
- Remove unused database users.
- Back up your database regularly.
- Use different database users for different websites when possible.
- Review database permissions periodically.
- Keep cPanel and your website software updated.
Common Problems and Solutions
| Problem | Solution |
| User cannot connect | Verify the username, password, and database name. |
| Access denied error | Check that the correct privileges have been assigned. |
| User not listed | Create the database user first. |
| Wrong database selected | Remove the user and add them to the correct database. |
| Website shows database connection error | Confirm the database credentials in your website configuration file. |
| Forgot to save changes | Return to the privileges page and click Make Changes. |
Frequently Asked Questions
1. Can one database have multiple users?
Yes. Multiple users can access the same database if they have been assigned privileges.
2. Can one user access multiple databases?
Yes. You can add the same user to different databases individually.
3. Should I select All Privileges?
For WordPress and most CMS installations, yes. For custom applications, grant only the permissions that are required.
4. Can I change privileges later?
Yes. You can modify or remove privileges at any time through cPanel.
5. What happens if I remove a user?
The website may lose access to the database until the user is added again or another valid user is configured.
6. Is it safe to give All Privileges?
It is generally safe for your own website’s database user. Avoid giving full privileges to users who don’t need them.
7. Can I delete a database user later?
Yes. Deleting the user removes its access to any databases it was assigned to.
8. Why does my website still show a database error?
Check your application’s configuration file to ensure the database name, username, password, and host are correct.
Conclusion
Knowing how to add a user to a database and add privileges is an essential skill for anyone managing a website through cPanel. After creating your database and user, assigning the correct permissions allows your website to securely communicate with its data.
For most WordPress installations, selecting All Privileges is the quickest and easiest option. Always use strong passwords, keep regular backups, and review database permissions whenever you make changes to your website.
With these simple steps, you’ll be able to connect your database confidently and keep your website running smoothly.
