
How to Upload Files via the cPanel File Manager
Introduction
If you’re building or managing a website, you’ll often need to upload files such as HTML pages, images, videos, PDF documents, or WordPress files. A cPanel file upload is one of the easiest ways to add these files to your hosting account using the built-in cPanel File Manager.
In this beginner-friendly guide, you’ll learn how to upload files via the cPanel File Manager, where to upload them, common mistakes to avoid, and useful tips to make the process quick and secure.
Whether you’re launching your first website or updating an existing one, this guide will help you upload files with confidence.
What Is the cPanel File Manager?
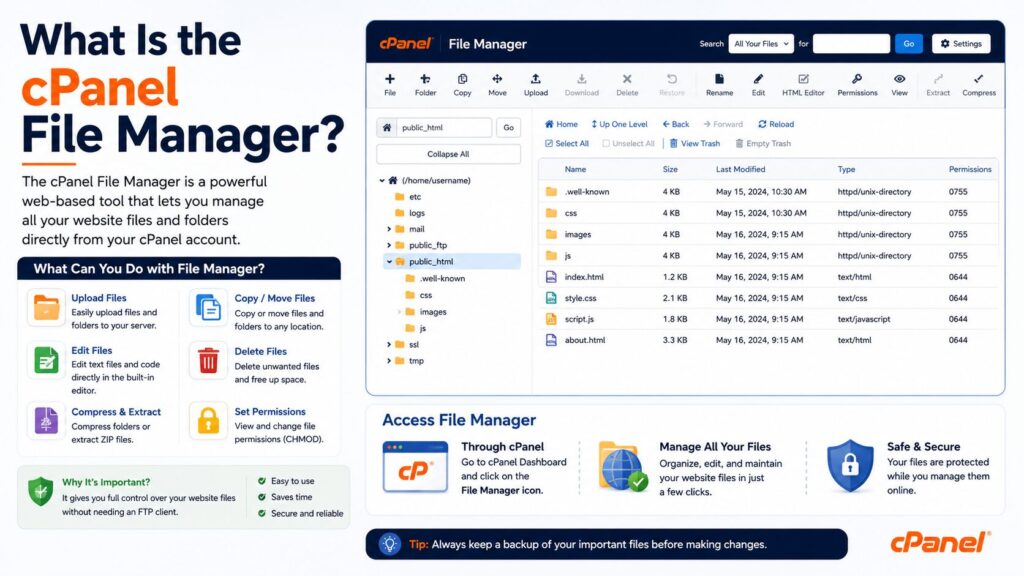
The cPanel File Manager is a built-in tool that lets you manage your website files directly from your web browser.
Instead of installing separate software like FTP clients, you can upload, download, edit, move, rename, and delete files from your hosting account.
Real-world Example
Imagine your website is a house.
- Your hosting account is the land.
- Your website files are the furniture.
- File Manager is the key that lets you place everything in the correct room.
Without uploading your website files, visitors won’t see your website online.

Why Is Uploading Files Important?
Uploading files is one of the most common tasks in website management.
You’ll use it when:
- Publishing a new website
- Uploading images
- Installing website scripts
- Uploading HTML pages
- Restoring website files
- Uploading PDF documents
- Updating CSS or JavaScript files
- Adding downloadable resources
Requirements Before You Start
Before uploading files, make sure you have:
- ✅ A web hosting account
- ✅ cPanel login credentials
- ✅ The files ready on your computer
- ✅ A modern web browser
- ✅ Enough available hosting storage
- ✅ A recent website backup (recommended)
Important: Always keep a backup before replacing important website files.
Step-by-Step Guide to Upload Files via the cPanel File Manager
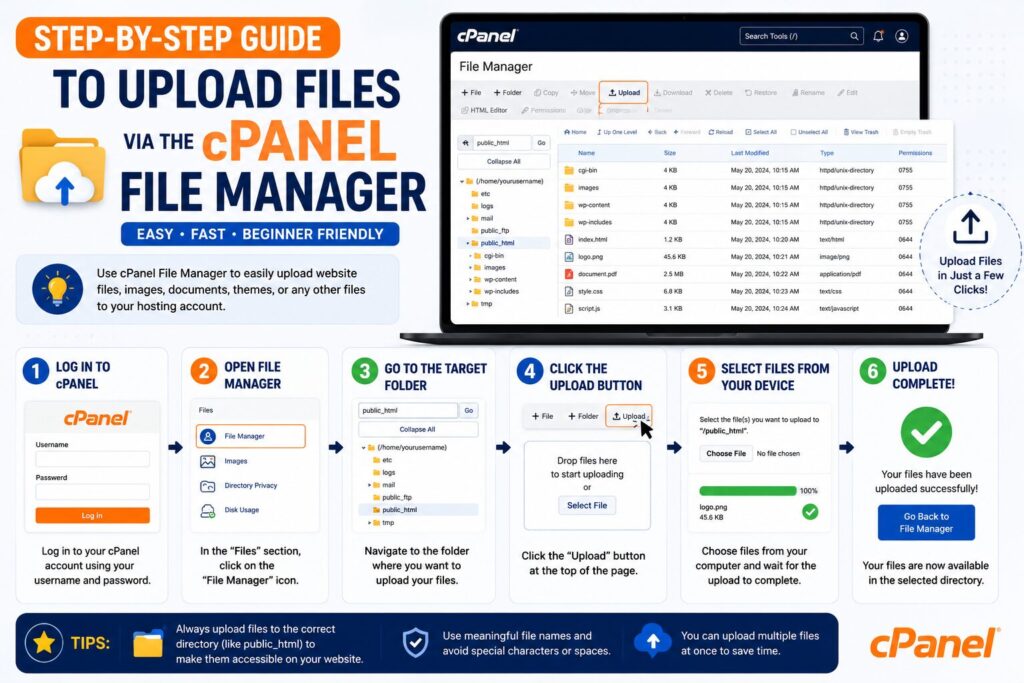
Step 1: Log in to cPanel
What to do
Log in to your hosting account and open your cPanel Dashboard.
Why?
You’ll access all website management tools from here.
What you’ll see
The cPanel home screen with different sections like:
- Files
- Databases
- Domains
Beginner Tip
Bookmark your cPanel login page for quicker access.
Common Mistake
Entering incorrect login credentials.
Step 2: Open File Manager
What to do
Click File Manager under the Files section.
Why?
This tool lets you manage every file stored on your hosting account.
What you’ll see
A folder structure similar to Windows File Explorer.
Common folders include:
- public_html
- logs
- tmp
Beginner Tip
Most website files belong inside public_html.
Common Mistake
Uploading files into the wrong folder.
Step 3: Open the Correct Folder
What to do
Navigate to:
public_htmlOr if your website uses an addon domain:
public_html/domain-name/Why?
Files uploaded here become publicly accessible on your website.
What you’ll see
Website files such as:
- index.html
- index.php
- wp-content
- images
Beginner Tip
Double-check you’re inside the correct directory before uploading.
Common Mistake
Uploading files into the Home directory instead of public_html.
Step 4: Click Upload
What to do
Click the Upload button at the top of File Manager.
Why?
This opens the upload window where you can select files from your computer.
What you’ll see
An upload page with options to:
- Drag and drop files
- Browse your computer
Beginner Tip
You can upload multiple files at once if your hosting provider supports it.
Common Mistake
Closing the upload window before the upload finishes.
Step 5: Select Your Files
What to do
Click Select File or drag files into the upload area.
Why?
This transfers your files from your computer to your hosting account.
What you’ll see
A progress bar showing upload status.
Beginner Tip
Wait until the progress reaches 100%.
Common Mistake
Uploading incomplete files because the browser was closed too early.
Step 6: Return to File Manager
What to do
After the upload finishes, click Go Back to File Manager.
Why?
You’ll confirm that your files uploaded successfully.
What you’ll see
Your uploaded files inside the selected folder.
Beginner Tip
Refresh the page if the new files don’t appear immediately.
Common Mistake
Assuming the upload failed without refreshing.
Step 7: Extract ZIP Files (If Needed)
What to do
If you uploaded a ZIP archive:
- Right-click the ZIP file.
- Select Extract.
Why?
Many website files are compressed into ZIP format.
What you’ll see
New folders and files extracted automatically.
Beginner Tip
Delete the ZIP file afterward to save storage if it’s no longer needed.
Common Mistake
Trying to access files before extracting them.
Types of Files You Can Upload
| File Type | Example |
|---|---|
| HTML | index.html |
| PHP | index.php |
| Images | JPG, PNG, GIF, WebP |
| CSS | style.css |
| JavaScript | script.js |
| brochure.pdf | |
| ZIP Archives | website.zip |
| Documents | DOCX, TXT |
Best Practices
- Always upload files to the correct folder.
- Keep a backup before replacing files.
- Compress large websites into ZIP files before uploading.
- Delete unused files regularly.
- Use clear file names.
- Organize files into folders.
- Check file permissions after uploading.
- Refresh File Manager after uploads.
Common Problems and Solutions
| Problem | Solution |
|---|---|
| Upload fails | Check your internet connection. |
| File too large | Compress files into ZIP format. |
| Upload is slow | Upload during off-peak hours or use FTP for very large files. |
| File not visible | Refresh File Manager. |
| Website doesn’t update | Clear your browser cache. |
| Storage full | Delete unnecessary files or upgrade hosting. |
| Permission error | Verify file permissions. |
Frequently Asked Questions
1. Can I upload multiple files at once?
Yes. Most hosting providers allow multiple file uploads.
2. Can I upload ZIP files?
Yes. ZIP files are commonly used for uploading complete websites.
3. Where should I upload my website files?
Usually inside the public_html directory.
4. Can I edit uploaded files?
Yes. File Manager includes a built-in text editor.
5. What is the maximum upload size?
It depends on your hosting provider’s server settings.
6. Can I upload WordPress manually?
Yes. Upload the WordPress ZIP file, extract it, and follow the installation steps.
7. Why can’t I see my uploaded file?
Refresh File Manager and ensure you’re viewing the correct folder.
8. Is File Manager better than FTP?
For small uploads, File Manager is easier. For large or frequent uploads, FTP is often faster and more reliable.
Conclusion
Knowing how to upload files via the cPanel File Manager is an essential skill for every website owner. It allows you to publish web pages, upload images, install scripts, and manage your site’s content without extra software.
Always upload files to the correct directory, keep backups before making major changes, and organize your files for easier management. With these simple habits, you’ll manage your website more confidently and efficiently.
